Headlight restoration is a process that can make your old headlights look almost brand new. Headlights are one of the most important parts of your car because they allow you to see at night, but they also tend to get damaged over time from sun exposure and oxidation. The good news is that there are plenty of ways you can restore them back to their original state by yourself at home (or take them somewhere for professional help).
Who restores headlights?
Headlight restoration is a process that restores the clarity of the lenses on your headlights. It removes scratches and oxidation, which is a build-up of dirt, oil and other debris that dulls their shine. In some cases, it can even restore a lens to its original clear state.
Every headlight restoration service will have its own method for restoring headlights. Some services use sandpaper or pumice stones; others rely on chemical compounds like toothpaste or baking soda mixed with water. The best way to find out how each service works is by calling them directly (or visiting their website) and asking questions about their methods before booking an appointment.
How do they restore headlights
To restore your headlights, the process is simple. First, clean the headlight using a microfiber cloth or paper towel and water. Next, mix a paste made of baking soda and toothpaste in a bowl until it forms a thick consistency. Apply this mixture to the headlight with your fingers or a brush and let it sit for 10 to 15 minutes before scrubbing off with an abrasive pad or polishing cloth. You can also apply toothpaste directly onto the headlight then scrub away with a soft-bristled toothbrush if you don’t want to make your own paste at home (although we recommend making one yourself).
Why do they restore headlights
The reasons for headlights restoration are numerous. For one thing, headlight restoration is cheaper than new ones. In addition, many companies that do this sort of work are environmentally conscious, so they use green products in the process. Also, restoring headlights makes them more durable and longer lasting than if you just replaced them outright with new ones from a store or manufacturer. Finally, most people who restore their own headlights will tell you that their appearance is improved by making this simple modification; it’s as if they look like they’re brand-new again!
The main reason I went ahead with my own headlight restoration was because my car had been involved in an accident and needed repairs anyway—the insurance company paid for everything else but covered only half of what it would’ve cost me to get replacement headlights installed on my car!
Where do they restore headlights
Headlight restoration is a process that can be performed in a number of different locations, including:
- Shop. Headlight restoration professionals often have their own locations where they perform the service.
- Home. Some people prefer to do the headlight restoration process at home, instead of paying someone else to do it for them. This can be done with kits and supplies available online or at local stores like Walmart and Target.
- In transit (on roads). If you’re on the road when your headlights are damaged by something like hail or sand, there’s nothing stopping you from having them repaired while traveling! Unfortunately, this means that there will likely be some downtime between when you notice damage and actually get around to having repairs done—but if this isn’t an issue for you then it could save time and money overall!
When do they restore headlights
Headlight restoration is a process that can be applied to damaged headlights. When your headlights get damaged by the sun or rocks, they may look cloudy and foggy. This can make it difficult for you to see at night and it’s also not safe for other drivers on the road because they won’t be able to see you either. By restoring your headlights, you’ll be able to restore the brightness of them so that everyone will have great visibility when driving at night.
Who does Headlight Restoration?
The first question you might have is, who does headlight restoration? Headlight restoration is done by a professional company that specializes in restoring the head lamps of cars to their original condition. These companies use special tools and techniques to make sure that your headlights are restored properly and safely.
The next question you may be asking yourself is how do they restore headlights? The answer to this question has two parts: (1) it depends on what type of damage your headlights have suffered; and (2) there are three different methods used for restoring headlights: sanding, buffing/polishing, or coating them with a protective film.
So why do people choose these services? There are many reasons people choose these services but one reason stands out above all others, safety! Having good quality lights on your vehicle not only makes it easier for others around you to see when driving at night but also improves visibility while driving during daylight hours as well!
We all know that headlight restoration is much cheaper than buying new headlights.
We all know that headlight restoration is much cheaper than buying new headlights, but how much does it cost to have headlights restored? And what are the benefits of having them professionally restored?
Headlight restoration generally costs between $200 – $300 per pair, depending on the severity of the damage and whether or not you want an additional protective coating for durability. This may seem like a lot at first glance, but when compared to the price tag of buying new headlights (which can easily reach into the thousands), it’s definitely worth considering.
What does headlight restoration involve? There are two main steps involved in headlight restoration: polishing and sanding. Using state-of-the-art tools and techniques, technicians will polish away scratches with fine abrasives until all traces of damage are removed from your lenses, restoring them back to crystal clarity. After this process has been completed successfully, technicians then use a special adhesive sandpaper called wet sanding pads which remove any remaining residue while smoothing out any remaining imperfections caused by poor lighting conditions such as rain or snow over time.
But do you know what it takes to restore a headlight?
When you need to restore your headlights, it can be an overwhelming task. The following information will help you get started on the right foot in terms of knowing what tools you need and how long it will take to complete the restoration.
- What tools do I need?
Tools needed: A drill with a 121/64” bit for the headlight assembly. A Phillips screwdriver for removal of screws. An Allen wrench for removing bolts in the headlight assembly. An orbital sander or sanding pad attached to a cordless drill (or electric sander if available).
Let’s take a look at the process.
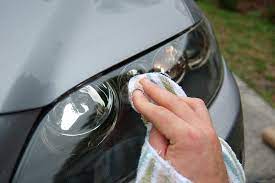
First, you’ll want to thoroughly clean your headlights with soap, water and a rag.
If you don’t have the tools needed to do this yourself, there are many companies that will come to your house and do it for you. It’s important that the headlight lens is clean before proceeding with the restoration process.
Next, attach sandpaper strips or a polishing pad (a foam block) onto an orbital buffer. When using these items make sure they’re not too abrasive or hard on the lens because they could scratch it up instead of polishing it out. Start applying pressure as you spin around in circles until all visible haze has been removed from within the headlight lens.
First, you need to thoroughly clean your headlights using soap, water and a rag.
First, you need to thoroughly clean your headlights using soap and water. Any type of cleaner will do; even dish soap can be used. Make sure the headlight is completely dry before continuing on with restoration.
Next, apply a coat of headlight restoration compound or liquid wax to the entire surface of your headlight with a microfiber towel that’s been sprayed lightly with water. You want this layer to be thin so that it applies evenly without leaving streaks or drips behind as you move through each step in the process.
Next, you will use a piece of sandpaper to remove a thin layer from the top of your headlight lens.
After the water evaporates, you will use a piece of sandpaper to remove a thin layer from the top of your headlight lens. The sandpaper should be abrasive enough to remove the haze but not so abrasive that it damages the lens. You should use circular motions until your headlight is clear again.
This removes any haze or cloudiness that might have formed over time.
Haze is created by dirt, sand and other particles that can get lodged in your headlights. This can also be caused by oxidation, which happens when UV rays from the sun attack your headlight lenses. The more time you spend driving at night with your lights on, the more damage your lenses will sustain over time.
When done properly, headlight restoration should actually improve visibility for drivers at night because of its ability to remove dirt and grime from the surface of lens covers.
Then you will use a drill with a foam pad to buff the light bulb until it is clear again.
Once you have the headlight bulb cleaned, you will use a drill to buff it. You should use a foam pad that is included with the kit. The purpose of this buffing is to remove all residual dust and oxidation from inside the headlight bulb.
You can do this by putting your hand on top of the foam pad and holding it as if it were a palm sander; then start circling around in small circles on top of the bulb until there are no more scratches or marks left on its surface. Do not apply too much pressure onto the bulb at once and do not move too fast or else you may damage your new headlights! If any residue gets stuck onto your new bulbs, clean them off immediately with a damp cloth before trying again with this process because they might cause further problems later down the road if they aren’t taken care of right away!
The last step is to apply three coats of car wax over your newly polished headlights so they are protected from future damage caused by dirt and grime as well as UV rays from the sun!
This step is what separates a good headlight restoration from a bad one. When you have your headlights restored professionally, they will look brand new again!
Headlight restoration is an inexpensive alternative to buying new headlights.
When you have your headlights restored, they’ll look as good as new, and they’ll also be protected from rust and other damage.
The process of restoring headlights involves removing dirt and grime from the headlight lens using special tools. Then, the technician uses a sanding disc to smooth out any imperfections in the glass. This process can take between one hour and four hours depending on how much work needs to be done on each vehicle’s particular set of headlights (and whether or not there are stone chips present).
Conclusion
Headlight restoration is an inexpensive alternative to buying new headlights. It’s a great way to keep your car looking its best while saving money at the same time!
The restoration of headlights is a very important process that has been done for many years. They are able to restore the headlights on your car so that they look like new. This can save you money because instead of buying new ones which could be expensive, they will just replace some parts or use chemicals to clean them up so they look good again.