
Tips on how to lean uel injectors at home; Fuel injectors are an important part of your vehicle’s engine. They help regulate the flow of fuel into each cylinder, which is critical for proper combustion and power. The problem is that they can become clogged with dirt and debris over time due to normal wear and tear on the road. If you notice problems like rough idling or stalling, it could be time to clean your fuel injectors and get back on the road again with a car that runs like new!
Cleaning your vehicle’s fuel injectors is an important part of maintenance. Injectors are responsible for spraying the correct amount of fuel into your engine, and when they’re dirty, it causes misfires, poor performance, and higher emissions. If you’re planning to do this yourself instead of taking your car in for an oil change or other service appointment (which we recommend), we provides you with steps below.
It has been estimated that up to 50 percent of cars in the United States have dirty fuel injectors. If you don’t keep tabs on how well your vehicle is performing, this statistic can be detrimental to your health and safety. The good news is that it’s easy to clean your own fuel injectors at home with a few simple tools. This guide will walk you through the process from start to finish, including what tools you’ll need and what kind of results you should expect after cleaning them yourself!
Why You Should Clean Your Fuel Injectors
Injectors are the heart of your fuel system. They deliver fuel directly to your engine’s cylinders, and when they become clogged with build-up, it can affect performance and efficiency, and even damage your engine.
In addition to servicing your air filter every 5,000 miles (or every 15 months), you should also think about cleaning your fuel injectors at least once a year or after each oil change if possible.
The Effects Of Dirty Fuel Injectors
Fuel injectors are one of the most important parts in your car, as they control how much fuel is delivered to each cylinder. When they are dirty, they will not work properly and this can lead to a number of problems with your engine. The worst-case scenario is that you might have to replace them!
This article has been written by a professional mechanic who is also an expert on cars. His advice will help you understand how dirty fuel injectors can affect your vehicle so that you know what steps to take if you need to clean them yourself or bring it into a garage for repair work.
How To Identify Dirty Fuel Injectors
There are several ways to identify dirty fuel injectors.
- You may observe a check engine light on your car’s dashboard, which signals an error code triggered by the engine control module (ECM). The ECM monitors the status of each component and reports any problems it encounters to an onboard computer system known as an SRS airbag control unit (ACU). The ACU will then turn on the “Service Engine Soon” light and provide specific information about what caused the fault code to occur, including whether or not it was related to emissions or drivability issues.
- Another way to test for faulty fuel injectors is through visual inspection of your vehicle’s exhaust system while it’s running in idle mode at half throttle. This method works best when you have access both behind and beneath your car—either because you’re working on it yourself or because someone else has lifted up one side so that you can examine it more easily from underneath without having too much trouble getting around their feet! To perform this test:
- Listen for rattle-like sounds coming from inside either one or both of your catalytic converters; then look underneath them carefully enough so that if there were any loose pieces lying around after breaking off from inside each converter due to excessive wear over time (such as small pieces of carbon deposits), then hopefully now would be when they’d be visible!”
Remove the Engine Cover
- Remove the engine cover
- Inspect the engine for any damage or loose parts
- Check for any oil leaks
Clean and Disconnect the Negative Battery Cable
Before you begin, make sure to disconnect the negative battery cable.
Now that you have confirmed your vehicle is in park and your parking brake is set, remove the fuel injector rail by removing two 14mm bolts and then lifting up on it. Be careful not to drop any small parts as they can be difficult to locate later on.
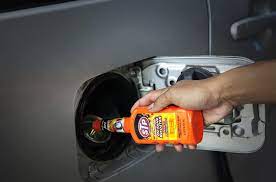
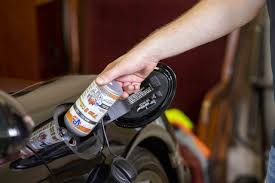
Removing the injectors from their housing will require a 17mm wrench or socket tool; once they’re loose, clean each individual injector with an approved cleaner/disinfectant spray cleaner like CRC Injector Cleaner Plus or Purolator Fuel Injector Cleaner+.
Remove the Fuel Injector Rail
- Remove the Fuel Injector Rail
To remove the fuel rail, use a socket wrench to loosen and remove all 12 bolts from the rail. Once removed, you can clean it with a wire brush or other cleaning tool.
Clean Each Individual Injector
Once you’ve gotten the injector out, use a fuel injector cleaning kit to clean it and replace it. The kit will come with instructions on how to go about this. Begin by disconnecting the negative battery cable, then unplugging any electrical connections for the injector in question. Using your hand or an appropriately sized socket wrench, remove the nuts that secure the injector to its bracket and pull it off. Clean each individual component using one of these methods:
- Spray alcohol down into each hole where fuel enters (you can also use compressed air)
- Scrape away dirt with a small screwdriver
- Wipe everything down with paper towels until they come out clean
Make sure to check your owner’s manual for your vehicle and double-check the steps for your specific car before starting.
While cleaning your fuel injectors at home is possible, you should always check your owner’s manual for your vehicle and double-check the steps for your specific car. Before starting this process, make sure to disconnect the negative battery cable. This will prevent any electrical damage caused by static electricity while working with the fuel system. With a ratchet wrench, loosen and remove the fuel rail clamp so that all six injectors can be removed without damaging them or yourself. Use a paintbrush to scrub off caked-on dirt from each individual injector as well as around each connection point on the rails themselves (if there are any).
Conclusion
Remember, when you’re cleaning your fuel injectors at home, it’s always better to be safe than sorry. It may seem like a simple task at first glance, but there are many things that could go wrong if you aren’t careful! So before attempting this process yourself, make sure to check your owner’s manual for specific instructions on how to do so on your vehicle. Cleaning your fuel injectors could be simple a job that can be done at home. It will save you money, and it will make your car run better.